


A Machine Quilting Design That Works
By Mary-Jeanine Ibarguen
I don’t know about you, but sometimes I have a hard time figuring out a machine quilting design for a project, whether it’s a quilt, bag, table runner etc. Often with a quilt panel, you have a motif in the middle of a field…Pooh or Santa or an elephant or…(you get the idea). Do you quilt around the motif? Through the motif? Echo quilting? How to distribute the quilting evenly yet honor the motif in the center?
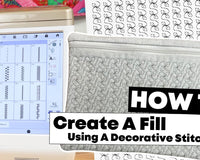
I’m going to share with you my go-to design that works for me: elongated diamonds. These are not simple squares turned on point. No, the diamond shape elevates the whole project, in my humble opinion. So instead of 90 degree lines, these are 30 and 60 degree lines. You can choose the density of the lines, the decorative stitch used or choose to free-motion the lines (more later).
Make your choices:
Diamond Size: I usually draw the lines 2” or 3” apart, depending on the size of the project. You could go smaller or bigger than that of course.
Stitch choice: you can use a decorative stitch (lets use those 200+ stitches ladies and gents!) or you can choose to free-motion the lines. Please don’t choose a decorative stitch that takes time to stitch out and puts down a lot of thread…your project will get hard in the spots AND it will take forever to stitch. Choose an open stitch design.
Here are some examples:
Pinkerton Wall-hanging (36” x 63”): the chalked lines are 3” apart, and I free-motioned wavy lines down each chalk line.

Detail:

Peacock (20” x 20”): The Hera-marked lines are sewn down with a straight line, which was a good choice given the modern feel of the piece.

Yoga Mat Carrier (‘Roll with It’ pattern): Hera marked lines lasted long enough to quilt each piece. This piece uses Soft & Stable as the ‘batting’, which gives the quilting a great look. The decorative stitch was a scallop, found on the ‘utility screen’ of my sewing machine.


Marking the lines: some design marking choices are:
- Hera marker - hard plastic tool that puts down a visible crease in your quilt sandwich, soon to be worn away
- Chalk – I like my Chalkoner; just choose something that brushes off easily
- Blue painters tape: can be reused again and again, just don’t sew through it, just right next to the tape.
You will need:
- A ruler with 30 and 60 degree lines. Most rulers have these, just look through your pile
- Marker of your choice (Hera, chalk, tape)
- NOTE: this is NOT a good time to use a Frixion pen, since the lines may return. I only use my trusty Frixion pen on the back of fabric, where it will never be seen.
- A yardstick to extend the line of your ruler
- Optional: blue painters’ tape to mark your ruler
- Your project, basted with its 3 layers. You can spray baste, pin baste or fuse-baste. I spray basted mine, with a few pins for security in the corners.
Let’s Get Started:

Decide what direction is UP on your project. You’ll want the elongated diamonds to run up and down your project.
Find the 60 degree line on your ruler and mark it with blue tape. Optional but it sure helps the ol’ eyes. Put that ruler down on your project, lining up the 60 degree line with the straight edge of the project.
Mark that first line, using the yardstick to extend as needed.
Use the lines on your ruler to find the next line, either 2 or 3 inches away from the first line. Once you’ve filled the piece with one direction (left top to right bottom), move the blue tape to the 30 degree line on your ruler and draw lines the other direction (left bottom to right top). Completely fill the project with lines, all the way to the corners.


Sewing the lines: choices are:
- Use an open decorative stitch and your walking foot. Never used a walking foot before? Its time to learn! The walking foot is a quilter’s best friend, allowing all the layers to feed evenly. You don’t want wrinkles under your project or at the end of a line, do you!?!
-
- Use a straight stitch with your walking foot. I like to increase my stitch length to at least 3.0. Play on a scrap with your walking foot to find a stitch that looks nice but doesn’t take too long (says the Speed Queen).
- Install your freemotion pressure foot and quilt some wavy lines over the drawn straight lines. This gives your quilt lots of movement and interest. See Pinkerton quilt above.
In this example, I’m using a curvy decorative stitch, narrowing the width to 2.5 and elongating the stitch since I’m using my walking foot.
You can see the Hera creases, but not for long…they will be gone soon with all my handling! Here are a few process pics:


-
OK, hopefully you’re still with me, because I want to share another fun idea with this technique. If you play your cards right, you can sew all of this without cutting your thread and moving your foot. Yep! Its kind of a throwback to that old game of Pong, bouncing off the edges and going another direction. I consider it a challenge to sew the whole quilt without cutting a thread.
Here is how it goes:
I like to start in the corner and sew a long line. When you get to the end of that line, find the closest line that goes off at the other angle and follow that one till the end. Just keep bouncing off the edges like this:


-
Done! I was able to fill this paper with diagonals without picking up my pen! (gotta find the fun where you can).
Enjoy the process,
Mary-Jeanine


1 comment
Sarah
I am a very new to quilting and I want to make a quilt for my great grandson.what is the perfect stitch for me. Help