


Supply List:
1 Parisienne Panel
1-½ yards of webbing for straps
1-1/8 yard of kraft tex
¾ yard lining
1 ½ yd drawstring
Odi coat (use card that came with it to swipe on material)
Heat n bond, spray glue or any fabric adhesive
Cutting:
Exterior: cut out 2 panels (one for front and one for back of bag)
Kraftex: cut out 2 pieces 16.5”w x 12.5”h for front and back of bag
Cut out 2 pieces 4”x 12.5”h for side panels
Cut out 1 piece 4”w x 16.5”h for bottom panel
Interior: cut out 2 pieces of lining fabric 21”w x 24”h
Prepping Pieces:
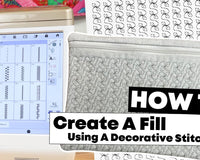
To make Kraft Tex paper softer and get that leather like look, it needs to be soaked, washed, or boiled and crumpled up. There are many tutorials on YouTube about these different methods. I crumpled my pieces up first and put them in the washing machine along with the fabric panels for the exterior on the hottest setting ( I left the edges of the cotton panels unfinished because I like the rough, raw edge look) I hung them to dry and then ironed them flat. Next, I had to adhere the fabric panels to the Kraft Tex paper pieces. I tried the Odicoat waterproof glue, I found that it didn’t adhere like I had hoped. I applied it with a paintbrush on the Kraft Tex first then placed the fabric panel on top and applied another coat on top of the fabric and let it dry. When it was dry, I found it didn’t adhere everywhere, there were some places where the fabric was not glued to the Kraft Tex, so I decided to do some decorative stitching over the panel to keep everything in place. You can also embellish with crystals, trims, ribbon or beads.


Construction: Since the Kraft Tex doesn’t fray, I decided to have my seam allowance on the exterior for a different look. Wrong sides are sewn together on the exterior. First, I sewed the front panel to the side panels, then sewed the back panel to the sides. Next, I matched up the bottom panel to the body of the bag, and sewed together. The corners were a little tricky, I sewed up to a corner then stopped and back-stitched, then lifted the presser foot and moved the seam allowance so I did not sew over and flatten the seam allowance. I continued around the bag with this method.


I sewed this bag with the top side on top and the bottom panel underneath, this way I could move the seam allowance out of the way.
Next, I cut the webbing in half for the straps, so each piece is 27”. I measured in 3” from the side seam (on the top edge) to position the straps, then sewed the straps to the bag with an X and a square around the x for security.
Next, the lining pieces are sewn together at the side seams. Start at the top edge and sew down 3.5” and stop, back-stitch.Leave a 7” opening and continue sewing the seam to the bottom edge. Then,press the seam open. Finish the edges by turning under and pressing and then so a narrow hem. Next, fold the top edge over so wrong sides are together and sew them together to create a band. Now create a casing for the top edge and sew a line of stitching all the way around. Then, measure ½” down from the first line of stitching and sew the second line of stitching. Feed the drawstring thru the casing and knot the ends. Next, I sewed the bottom edge together.


Now to create a boxed corner, I measured and cut out a 2” square from each bottom corner. Stack the bottom sewn on top of the side seam, right sides together, so they line up and sew raw edges together. Leave the lining right sides together.
Next, I put the lining down inside the exterior of the bag and lined up the bottom panels together and spread the lining out flat. Wrong sides will be together. Sew a line of stitching ½” down from the top edge and in 2” from the side edges to connect the lining to the exterior. I only sewed the lining to the side panels by tacking in the center of the side panel. Now your Parisienne Market Tote is complete.